Computing

The Drawing Toolbar

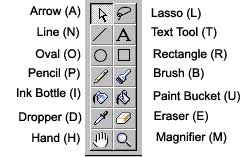
Knowing Flash is knowing how to make optimal use of your toolbars. The most important of which is the drawing toolbar. This toolbar is located on your extreme left and will look somewhat similar to what you see in the figure. It has options like line, oval, brush, eraser, etc along with their various modifiers. The letter in brackets is the shortcut key for each tool. Using the shortcut keys instead of using your mouse will help do things in a faster way.

Let's see what these tools can do for us

Arrow Tool (A):
The modifier section of the arrow tool contains:

  • Magnet - Toggles the Snap Feature (It has the ability to 'snap' objects to a grid or other objects).
  • Smooth/Straighten - Simplifies selected lines or shapes.
  • Scale/Resize Tool - Displays handles around object for scaling.
  • Rotate - Displays handles around object for rotating it according to needs.
Lasso Tool (L):
The modifier section of the Lasso tool contains:
  • Magic Wand - It can be used for selecting particular parts of an image.
  • Magic Wand properties
  • Polygon Mode - It is used for drawing polygons.
Text Tool (T):
The modifier section of the text tool contains:
  • Font Type
  • Font Size
  • Font Color
  • Bold and/or Italic
  • Alignment
  • Paragraph Settings
  • Text Field
Oval (O):
The modifier section allows you to change
  • Outline Color
  • Outline Thickness
  • Outline Style
  • Fill Color
Pressing " Shift " will enable you to draw a perfect circle.

Rectangle (R):
You can draw rectangles using this tool. The modifier section contains
  • Outline Color
  • Outline Thickness
  • Outline Style
  • Fill Color
  • Corner Radius
Pressing " Shift " will enable you to draw a perfect squares.

Pencil Tool (P):
Use this to draw lines and shapes. Modifier section will contain
  • Pencil modes: Straighten (for automatically straightening the lines when you draw them), Smooth and Ink (like regular drawing)
  • Line Color
  • Line Thickness
  • Line Style - Solid, dashed, dotted, etc...
Brush Tool (B):
Used to paint filled shapes on your movie
  • Paint filled shape (paint normal/ paints fills/ paint behind/ paint selection/ paint inside).
  • Brush color to paint with
  • Brush size
  • Brush Shape
  • Lock fill - will connect other paint 'area' as long as they are the same color
Ink Bottle Tool (I):
Use this to add a line to a shape or modify an existing line. Modifiers will allow you to change:
  • Line color
  • Line width
  • Line style - Solid, dashed, dotted, etc...
Paint Bucket Tool (U):
Fills unfilled outlines and changes the fill color of existing fills or shapes
  • Fill color
  • Gap size - It controls how large gaps can be before they are not recognized as one fill shape.
  • Lock Fill - It can 'attach' one fill to another, and appear to be part of one shape.
  • Transform Fill - Ii has the ability to rotate, screw, and scale fills.
Dropper Tool (D):
Picks up a fill or line style when you click on a shape or line.  It has no modifiers.

Eraser Tool (E):
Deletes portions of lines and shapes in the movie
  • Eraser Mode - It control what can be erased -- normal, erase fills, erase lines, erase selected fills, erase inside.
  • Faucet - It erases entire lines or fills.
  • Eraser Shape
Hand (H):
When the Stage is magnified, you may not be able to see all of it. The hand tool lets you move the Stage so that the view changes without making you change the magnification.

Magnifier Tool (M):
It gives you the ability to enlarge or reduce the view of the movie. If you drag a rectangle around a certain area it will zoom in to that specific area.  Using the Alt key will allow you to toggle between Zoom in and Zoom out modes.
 

14-Nov-2000

More by :  Ankur Kamthe

Top | Computing

Views: 5080      Comments: 0


Name *

Email ID

Comment *
 
 Characters
Verification Code*

Can't read? Reload

Please fill the above code for verification.