Computing

Motion Guides

What are Motion Guides ?
Motion Guides/Paths are lines that you can draw to have a object/symbols following that path during tweening.  Usually when you just tween, the objects move in a straight line.  By putting a motion guide on that object you can make it follow an twisted, curvy path, along zig zag loops, etc.

Working Of Motion Guides:

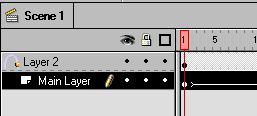
In the above image you can see how the motion guide layer has the icon next to it.  To do this, right-click on the layer which has the object you want should follow the path ( in this picture I wanted the 'main' layer to follow a path).  When you click the layer properties, you select 'Add Motion Guide'.   This will insert a layer directly above the 'Main' layer.

Thus, a motion guide is a layer which has only the path (drawn using a pencil) on which we want the object/symbol to follow.  There should be nothing else on this layer.  On your original layer with the object you will make sure the 'Snap' (Under View Menu, shaped like a magnet) is on and on the first frame you will snap your object to the beginning of your drawn line.   On the last frame you will snap it to the end.  Then just do a motion tween and your object should then follow your path. 

Just follow the tutorial given below and we will be making things move along any path. If this sounds confusing hang in there. For just a little while from now you will get the knack of things.    

Steps for making Motion Guides

  1. Draw a circle (your object).

  2. On your main movie insert the object into it's own layer.Call this layer "main".

  3. Move to frame 20 and insert a new keyframe (Insert>>Keyframe)

  4. Select the layer and select "Add Motion Guide".

  5. On the motion guide layer use the pencil tool to draw a path along which your object will follow.  This can be up down, side to side, zig-zag, curves, loops, etc.

  6. Now on the Flash menu make sure the 'Snap' feature is on (View > Snap)

  7. On the layer with your object in the first frame you will 'Snap' your object to the very beginning of your line that your drew for the motion guide. You will know it is snapped because a little black circle will show up and automatically pop into place at the tip of the line.

  1. On the layer with your object in the first frame you will Snap your object to the very beginning of your line that your drew for the motion guide.   You will know it is snapped because a little black circle will show up and automatically pop into place at the tip of the line :)
  2. Now, about 20 frames down on your object layer (not the motion guide),  (where you previously added your other keyframe and repeat the same thing except you will be snapping your object to the end of the line.
  3. Lastly, go back to the first frame with your object, double-click, and do Tweening > Motion and check 'Orient to Path Direction'.
  4. Now test your file and make sure it plays.  If you choose can just make the motion guide layer hidden and test it in the development area.

 So till next time, Adios.......

08-Feb-2001

More by :  Ankur Kamthe

Top | Computing

Views: 3463      Comments: 0


Name *

Email ID

Comment *
 
 Characters
Verification Code*

Can't read? Reload

Please fill the above code for verification.